MiniAtmegatron and iOS

In my exploration with what the MiniAtmegatron from Soulsby Synths can do I decided to try hooking it up with my iPhone via CCK(camera connection kit).

As the MIDI hacked Arduino is class compliant I wondered if it would work with iOS and I’m happy to say that it does! And as the this little 8bit wondersynth can be powered over USB the iPhone actually powers it too. 

This opens up various ways that you can use the MiniAtmegatron of course. Apps such as Little MIDI Machine can sequence it, you can use TouchOSC and it’s built in ‘Keys’ template to play it and if you make your own templates you can also control the MiniAtmegatron’s controls via MIDI CC(from the list available at the Soulsby downloads page). Other cool things you can do are sync it with other music apps(sequencers etc) because it responds to MIDI clock too. 

You could also use the Korg Synckontrol app alongside the MiniAtmegatron and the Korg Volcas/monotribe which should be possible(haven’t tried this yet but will do). 

So, if you have a MiniAtmegatron or are thinking of getting one then I recommend you try it with your iPhone/iPad. 

šŸ˜€

Here’s a link to the TouchOSC iPhone editor I created:- https://www.dropbox.com/s/ijx5j3fiag0sfdm/miniAtmegatron.zip?dl=0

I’ve added two pages going over the functions from the quick guide available at the Soulsby website.

Soulsby Synths miniAtmegatron


As you may know I’ve recently taken to a bit of electronic noise by building some small electronic noise making devices. I started with some simple things like the Atari Punk type noise generator using a couple 555 timer IC chips and things went further by researching what was available online to build in the form of small DIY kits. 

I found out that the company responsible for the acclaimed Atmegatron 8bit Synthesiser  Soulsby Synths have produced a very reasonably priced at under Ā£30 ‘build it yourself’ cut down version called the ‘miniAtmegatron’ (no surprises why it’s mini)


The Kit

With the kit you get all the components needed for building an Arduino Shield which then slots into an Arduino board(not supplied) to make the miniAtmegatron Synth. 

Soulsby do sell a ready to go programmed Arduino board on their site for a reasonable price too(I chose this when I ordered the kit too). Although if you do source an Arduino from somewhere else there are instructions on the Soulsby site for programming the Arduino.

The Build

I must say that you do need some previous soldering experience to put the synth shield together and highly recommend that you use a thin pointed soldering iron as the two LED’s are the most fiddly parts to solder in. I did have difficult with those but with a bit of care(and a solder sucker) I managed to solder them ok. 

Another thing I should mention is that I did find it difficult to see the colours on the resistors so I recommend the use of a magnifiying glass and decent light to work in. 

In all it took me around 30-45 minutes to put the miniAtmegatron together so it’s not too time consuming at all. 

The board itself is well laid out and the design is quite nice making it a pleasure to build. Especially once you plug the shield into the Arduino and see the LED’s light up the first time(I guess I was lucky as I normally have to redo a solder joint or two) 

The Synth

So what do you get once you’ve built the miniAtmegatron? 

You get an 8 bit monophonic synthesiser featuring its own unique Wavetable PWM audio engine, inbuilt sequences and other features taken from its bigger sibling the AtMegatron! 

The good thing about the mini is that it’s fully hackable(if you dabble in programming) too as the source code is available from Soulsby Synths. You can also find a new manual and detailed instructions including MIDI CC chart on this page too. 

My Verdict

Once built you have a very fun synth indeed! The sound quality coming out of the unit is fully 8bit crunchy goodness.

Once you MIDI the miniAtmegatron up and design a bass sound you like and run it through your setup you’ll like the tones you can get. 

The variety of waveforms and filter types this synth hold are varied enough to get you creating some fantastic sounds. And having the inbuilt sequences is fun if you just want to play around with the mini connected up to a Power Bank for total portability. 

The layout of the synth works really well with the coloured LED’s indicating the different modes and patterns, and the buttons and knobs are  of really good quality and feel very tactile even at this small size. 

There is a case available to buy too now(I didn’t get one) if you want to protect your miniAtmegatron from knocks. 

The only downside for me at the moment is that you can only save 1 patch to the miniAtmegatron but saying that some users may use the open source software to make a librarian someday.

Overall……

I love it!! 


Alesis Recital 88-Key Digital Piano

Alesis Recital Digital Piano review.
It’s not very often that I can say that I am pleasantly surprised by any product but with the Alesis Recital Digital Piano I am very impressed.

Upon opening and removing the Recital from its packaging and setting up with the supplied power adapter(it even takes batteries) all I can say is WOW, very nice!! 


If you want an easy to use digital piano then for the price this is a very good option. 

It has an 88-key, semi-weighted keyboard which although not on par with more expensive digital pianos it feels great to play and would suit anyone who wants to jump in and learn to play piano. 

Also included in the pack is a 3 month Skoove Premium Subscription(an online teaching course) which is great to get you started.

There are quite a wealth of features on the Recital which I see as being useful for any user be it a beginner right up to a pro user who wants a no fuss keyboard to use in the studio. 

It has stereo RCA outputs to connect to your external speakers, a sustain pedal input and USB MIDI connector for linking up to your favourite music software on your PC/Mac or even iPad(which you can see pictured running GarageBand).

The internal 20 watt speakers also sound great and don’t distort at high volumes and although they aren’t overly loud they are adequately suitable for playing in a small/medium room setting.

The speaker output is also cut out when you use the headphone output socket. It would have been nice if there were two headphone outputs for teaching but this would be easily solved by using a headphone splitter jack on the output.
The piano sound(although only one type of acoustic piano) is really nice and in full sounding stereo 

(low notes on left up to highs on the right) and having a polyphony of 128 notes you certainly won’t get any note stealing here. 


There are other sounds onboard(Electric Piano/Organ/Synth/Bass) and it also has a nice mode to layer two sounds and also split mode so you can play say a bass in the lower half of the keyboard and a piano in the top half. 

I do have one small complaint though, there is no Strings type sound to layer in with the Piano but that’s just me though(I’m a sucker for Piano/String combinations). 
There is also a cool Lesson mode that splits the keyboard range in two with the same notes/pitch so that two people can play along with each other side by side. 

This would certainly be a great keyboard for the school music room. 
All of the main sounds and options are accessed via the nicely lit blue buttons on the top panel along with a reverb and chorus to add to your overall sound. 

You can also access more advanced features on the Recital by holding down the Metronome and Teaching buttons and by pressing the relevant keyboard key(as detailed in the supplied manual). 

These features are things like the Click an Resonance of the pedal sound, the Velocity envelope of the keyboard, MIDI channel, Reverb/Chorus level, Metronome tempo and many more(described in the manual)…  
So, the Alesis Recital is a nicely built and featured Digital Piano for anyone looking at learning to play but also a nice addition for anyone that wants a no fuss 88-key keyboard to add to their studio. 

It won’t stand up to the more fully featured more expensive ones on the market but I highly recommend this for anyone who wants a low cost starter Digital Piano. And to be very honest it is really a steal at below the Ā£300 price point!

Nice one Alesis, very impressive at an affordable price!! 

Launchpad Mini/S Reason Remote Codec and Maps

Launchpad Mini Custom


After a few hours searching the internet for any help/support to get my Launchpad Mini working and at least ‘functional’ in Reason I came across SonicDetours custom Remote Map/Codecs.Ā http://sonicdetours.com/2014/05/09/remote-codec-for-launchpad-mini/

This was great as it meant that I could actually make some use of the mini as Novation haven’t provided Reason support(Not even with their Automap system).

Once I had things working in Reason I thought that it would be a great idea to also add MIDI input for Kong and Redrum so I had a little bit of help from another Reason user Koshdukai.Ā http://koshdukaimusicreason.blogspot.co.uk/ And the result of this is my custom Remote Map and Codec for Reason which you can grab here.

Those of you that are unsure of where to put the Codecs and maps go here:-Ā https://www.propellerheads.se/blog/tutorials/control-remote/

Those of you that do know won’t need my help! šŸ˜‰

With the Remote map I’ve done useful things like Transport controls Mute’s/Solos for the Mixer etc. But also things like Thors pattern sequencer steps can be switched on/off and you will see Thors LEDs light up right on the Launchpad Mini.

Dr Octorex can switch beween patterns, as can Redrum and the Matrix.

Load it all in and have a play. Reason only synths and Drum machines plus some utilities are in this version. I Ā intend to expand it for myself for Rack Extensions etc, but feel free to add your own Remote maps etc. šŸ™‚

BTW if you have the Minis bigger sibling it will also work!!


Thanks once again to SonicDetours and Koshdukai!!


TxK for Playstation Vita

Llamasoft this week are releasing their first game for the Playstation Vita. TxK is based on an old retro game called Tempest where you basically shoot your enemy on a simple 3D vector playing field.
The Vita remake looks fantastic and what is also great is that the soundtrack is awesome. I may be a bit biased as I provided two tracks ‘Trance One’ and ‘Space Flight’ for it but the other tracks are so damn good too!

Here’s a screenshot provided buy a fellow moosician(as I don’t have a Vita)

20140210-163019.jpg

This was a fantastic opportunity for me and thanks go to Jeff Minter and the llamasoft team for bringing a great game to the Playstation Vita.

We have also now released the Original Soundtrack on Bandcamp.

http://txk-ost.bandcamp.com/album/txk-the-original-soundtrack

Rack Extensions and Novation Automap

Setting up Reason Rack Extensions for Automap

Reason and Reason Essentials uses a protocol called ā€˜Remoteā€™ for communicating between control surfaces and midi keyboard controllers.

More information can be found here – http://www.propellerheads.se/products/reason/index.cfm?article=remote&fuseaction=get_article

Rack Extensions from third party developers donā€™t have Remote Maps set up automatically but with a bit of simple text editing you can set up your own for use with Automap.

Getting Automap and Rack Extensions talking to each other

Ā 

To get Automap to see your Rack Extension is a simple process of adding a modified text file to the Reason Remote Map folder.

Ā 

Locating the Remote Folder

Ā 

You can find the Remote map for Automap in these locations:

ā€¢ OS X!

Macintosh HD/Library/Application Support/Propellerhead Software/Remote

ā€¢ Windows Vista/Windows 7

C:/Program Data/Propellerhead Software/Remote

ā€¢ Windows XP

C:/Documents and Settings/All Users/Application Data/Propellerhead Software/Remote

Also please note that the location may be hidden if using Windows. To locate hidden files you need to go into the Folder and Search Options of Windows Explorer and make sure that ā€œShow hidden files, drives and foldersā€ is selected, in case you havenā€™t done so already.

Once you’ve located the correct location (in our case the ā€˜Novationā€™ folder) copy and paste the Novation Automap Control.remotemap to your desktop. Now open the .remotemap file with a text editor. For this Iā€™m using the free Text ++ which you can find here:- http://notepad-plus-plus.org/

Warning: Please make sure you back up the Novation Automap Control.remote file before proceeding in case you need to revert back to the original at any point.

Once open you will see a file, which includes all the Reason mapping for Automap.

Image

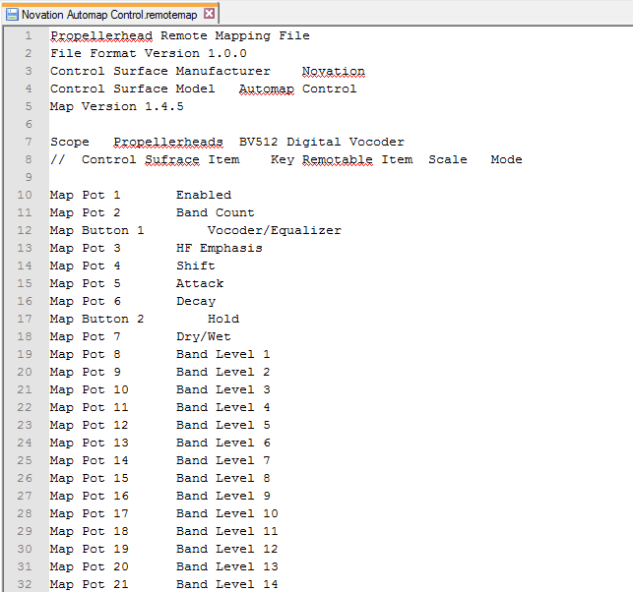
You can see from this file that all Automap uses is Pot 1-256 for the Rotaries and Button 1-256 for the Buttons on your Automap controller.

Finding a map for your Rack Extension.

There are a couple of resources on the internet that have Maps already set out for you. Reason user Kosh Dukai has a fantastic resource here:- http://koshdukaimusicreason.blogspot.co.uk/2012/06/rack-extensions-remote-side-of-it.html

And there are also pre made Remote files here that he and other users have provided here:- https://www.propellerheads.se/forum/showthread.php?t=176290

And Livid Instruments has kindly set up a web page here with the Remote maps too:-

https://github.com/LividInstruments/Reason_RE_Remote_Templates

Ā For this tutorial Iā€™m going to add Radical Piano to the Automap .remote file.

Ā 

So if you have Radical Piano go to one of the above links and download the text file and you should have something like this:-

Ā Guithub Radical

Now copy and paste this at the end your Novation Automap Control.remotemap file that you have open in your text editor.

You will have to add these couple of lines to get Automap to display the name of the Rack Extension:-

Ā 

Ā 

MapĀ Ā Ā Ā Ā  Device NameĀ Ā Ā Ā Ā Ā Ā Ā Ā Ā Ā Ā Ā Ā  "Radical Piano"
MapĀ Ā Ā Ā Ā  Instance NameĀ Ā Ā Ā Ā Ā Ā Ā Ā Ā Ā Ā  Device Name

So once you have done that and finished editing it should look something like this:-

Ā Edited Radical

Now save this finished file overwriting the one on your desktop.

Then copy the same file and paste it into the Novation Folder in the Reason Remote Map Folder.


Image


Set Up for Automap.

Ā Now you have configured the Remote Map open up Reason and go to the Preferences and click on the ā€˜Use with Reasonā€™ box in the Novation Control section to reload the Remote Map.

Image

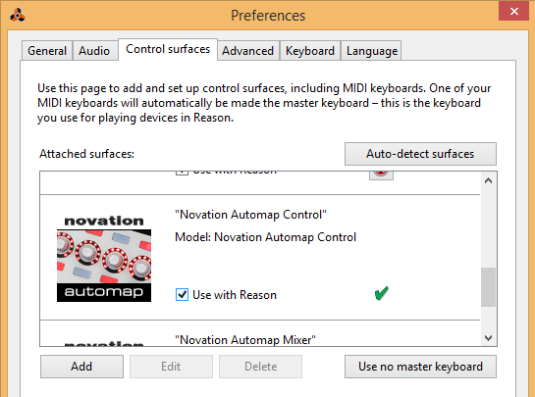
If there is a green tick then the map loaded correctly without errors. If there is an error box then you will need to go back through the previous steps mentioned and re-edit the .remotemap file. You have to be very careful with spacing with the Remote maps as one odd space on a line might reject the new map.

Now to edit the mapping in Automap itself.

Ā Image

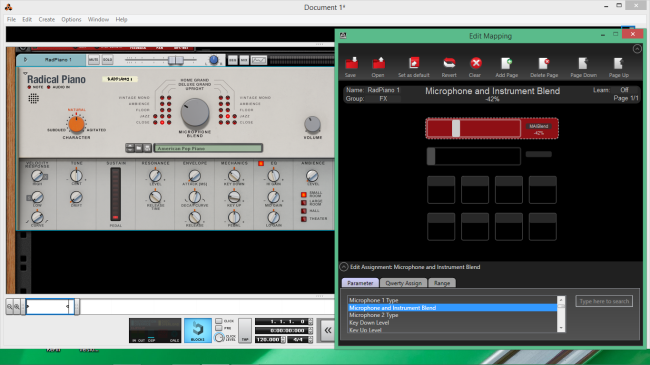
Go to the Edit Mapping screen in the Automap software and you can now assign Radical Pianos knobs and buttons to customize your Novation controller. Iā€™m using the Automap App on iPod for this but it will work for any Novation Automap Controller.

Remember to ā€˜Set as Defaultā€™ if you want to keep the settings for the next time you launch Reason.

As you can see itā€™s not too difficult to get Rack Extensions working with Automap. With a little bit of editing and copy/paste you can have control of your favorite Rack Extensions and Novation controller.

Thanks for looking.